
From Toilet Roll to Tiny Treasure!
My fascination with boxes—of all shapes and sizes—goes back years. For me, they’re not just storage; they’re little treasures waiting to be filled. After a while of collecting them, the idea of transforming these containers into art gave birth to my shadow boxes.
I was inspired by the world of altered books and fell in love with the process. Some of my shadow boxes are intricate, filled with curiosities I've collected from flea markets and travels. Others are wonderfully simple, like the one we're making today from an everyday toilet paper roll!
Upcycling is a great way to be creative and resourceful, and I hope you enjoy learning this simple technique. Variety is the spice of life, and mastering different crafting methods makes any artist more complete!

Part 1: Crafting the Miniature Box
This little box is the perfect rustic canvas for a small shadow box display. Here’s how to make it:
Materials
One empty toilet paper roll
Ruler
Pencil
Scissors or craft knife
Bone folder or embossing tool
White craft glue
Small pins or clips
Step-by-Step Instructions
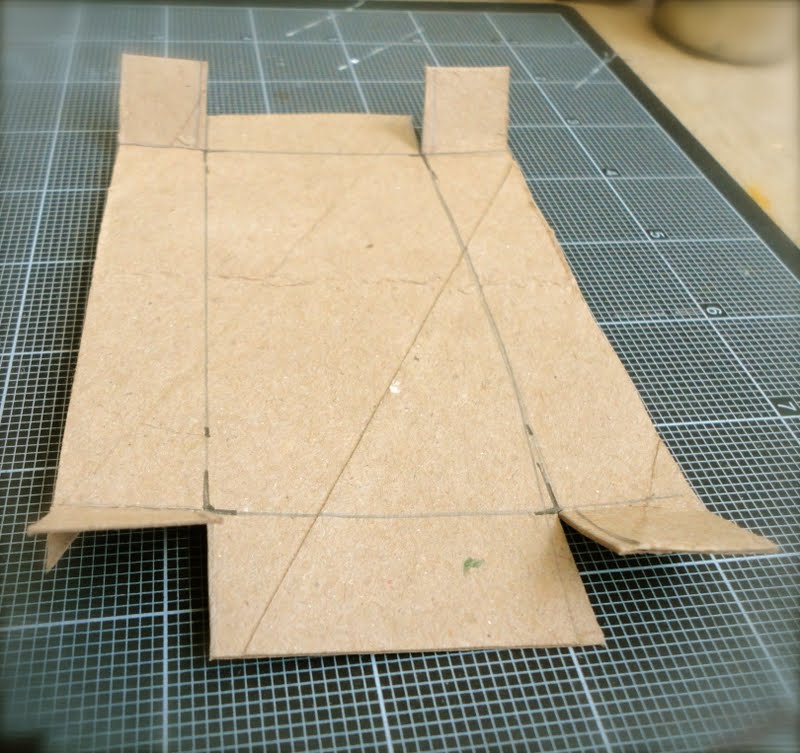
Mark the Sides: Using a ruler, measure and trace guide lines on all four sides of the roll. Pro tip: I used 2 cm per side (a little less than an inch), but using a full inch might be easier for you and won't stretch the box much. The sides need a good size to protect what’s inside!
Score the Lines: Use a ruler and a bone folder or embossing tool to gently score over your traced lines. Scoring helps the cardboard fold cleanly and easily. Be gentle!
Cut the Corners: Cut the lines at the ends of the roll, which will create flaps you can see in the photo below.
Fold and Shape: Use your ruler to help you fold all the sides inwards. You’re now close to the final box shape!
Secure the Box: Apply craft glue to the flaps. Use pins or small clips to hold the corners together until the glue is completely dry.
Voila! You have a sweet little rustic box. Isn't that easy and fun?
Note: Read the second part before crafting your box, maybe you want to add some collage before crafting it!


Part 2: Decorating and Designing the Shadow Box
Now for the fun part: turning your basic box into a dimensional piece of art!
Covering the Box
You can cover your new box with anything you like! I chose to use the paper maché technique, covering my box with vintage sheet music for a beautiful, aged look. Scrapbook paper or even painted gesso would look fantastic too!
Preparing the Background
Flatten the Roll: Take a second toilet paper roll and flatten it out. (You may do this step before the crafting of the box)
Attach Paper: Using white glue, attach a nice, natural fiber handmade paper to the flattened cardboard roll.
Cut to Fit: Cut this prepared piece to the exact size of the inside of your box. This will be the perfect rustic backdrop for your design.
Creating the Design
My design for this box is a sweet angel:
Cut the Focal Point: I carefully cut out the angel shape. A fresh blade on your craft knife is essential to prevent tearing your work!
Upcycle for Details: I used scraps from the same natural fiber paper and even pieces of the toilet roll to craft the angel’s wings and halo—no need to waste materials!
Prime the Surface: Lightly brush on some gesso. This primes the paper so paint absorbs better, but avoid covering it completely so the beautiful paper notes or words still peek through.
Add Dimension: I attached foam dots to the back of the angel. This simple step creates shadows, adding wonderful dimension and depth to the final piece.


Final Touches and Assembly
Paint your design as you like! I added words to accompany my angel, along with a sprinkle of glitter and stars. On the bottom, I used a universal transparent glue to attach moss and tiny flowers.
Finish and Protect: Spray the entire work with a fixative to protect it from dust and fading.
Hanging Your Art
To hang it, I created a loop with a piece of wire and attached it to the back using more paper maché (paper and glue). Since this box is super light, this method is strong enough. If your design is heavier, consider using a piece of strong fabric instead.
This little box is now hanging proudly! I plan to make a few more to create a charming wall arrangement.

The words on my finished box read:
"The fragrance of her soul remained humble and simple."
New watercolors Gallery


New Altered books Gallery
 |
| Altered book page |
 |
| Altered book spread |
 |
| Inspired in a dream Altered book page |
 |
| Altered book spread |
"Sometimes it is so dark, it's hard to see where to start walking. Whenever scared, close your eyes to the world. Listen, listen for a while— you will be guided."
What a sweet shadow box! Love your work!
ReplyDeleteSuch a great idea for the humble TP roll! And the watercolors are sooooo beautiful! Thank you for sharing your beautiful work... ; )
ReplyDeleteLotus
OMGosh Moni,
ReplyDeletethis toilet paper roll thing has no end in sight! I am loving it...I am now pulling cereal boxes, tissue boxes and anything else I normall would sent to the recycle center and cutting it all up and storing it in a basket for all my new projects!
Your watercolors are simply fabulous, but no surprise there:D
Much love and hugs,
Beth P
Wow Monica! Fabulous work. You have a lot of ideas with the tp roll and that is sure recyling. Love all your pieces. Thanks for sharing. Have a great weekend.
ReplyDeleteThank you girls! that`s wonderful Beth, I love that you are now thinking oustide the box, that`s the way to go! :D Let`s keep on recycling and being creative! :D
ReplyDeleteCheers...Moni.
This is great, Moni! I love to hear that you write to yourself in your journaling....it's what I often find myself doing as well...for years now!
ReplyDeleteBlessings ~H♥~
such beautiful art....as usual...
ReplyDeleteI Love the mini shadow box...adorable, great idea!! Love your watercolor pages also....the little bird is my favorite I think!! TFS Patti
ReplyDeletelove all your art Mona, love the angel, had to try drawing one, hope to find a place to post it ..thank you for all you do for us
ReplyDeleteOh my goodness, I absolutely love this! It has touched my soul. I lost my mother a few weeks ago and I know that she is now an angel. I am going to make this in honor of her. Thank you. God must have guided me to see this to help ease my pain.
ReplyDeleteLovely, thank you
ReplyDeleteQue preciosa
ReplyDeleteSo sweet 💜 I’m inspired! Thank you & bless you!
ReplyDeleteSo inspiring! Thank you Monica!
ReplyDeleteI, too love boxes of every shape size and color. Your shadow box is very sweet and the quote is just right! Beautiful water colors too!
ReplyDelete